How To Make Multigrain Bread
This post may contain affiliate links, that if you make purchases through, I will earn a small commission.
Make two soft and fluffy loaves of hearty homemade multigrain bread with this easy to follow step by step recipe!

With a new year comes resolution, lose 15 pounds, call your mother more, what have you. I’m resolving to learn all of those pesky tips and tricks that no one seems to talk about anymore, those little things that make all the difference in the kitchen and make you look like an absolute rockstar. And lose that 15 pounds I’ve been resolving to lose for the last three years, but that’s neither here nor there.
I’m talking about homemade multigrain bread. It will make you look like a flipping star! And it’s so much better than storebought.
Every Tuesday, we’ll be covering different tips and trick through the kitchen ranging from today’s first installment, on how to bake bread, to things like how to make compound butter, poach an egg, roast a chicken, how to make stock, how to roast garlic and anything else you guys want to learn! This is as much for you guys as it is for me. When I realized how satisfying it was to pull a warm loaf of bread out of the oven that I had baked with my own two hands, it was a GREAT feeling and something I wanted to share with all of you. And well, carbs. DUH.
Some of these things might seem too rudimentary, too mundane, but I figure when we (Yes, I’ve invoked the royal “We”) know and understand the basics we can build on that and grow our expertise in our own kitchens – from the ground up.
Is making bread easy?
Last weekend I put up a question on my Facebook page on what everyone wanted to learn and I got some great responses. The one that struck me the most was – how to make homemade bread. Or any yeasted carbs for that matter. The biggest complaint with yeasted breads was that yeast is intimidating. Been there!! I can’t express how many times my yeast didn’t take, my bread didn’t rise and I threw my floured hands up in the air and had an absolute meltdown over it. Truth. But once you know how-to (ahhh, see what I did there? *dork*) make the yeast your little carbon dioxide emitting minion, you’ll be baking up a loaf of bread, or cinnamon rolls if that’s more your speed (nod “yes”), in no time.
Just bring your patience, a rainy Saturday morning and a few hours. Patience is key and something you will need to add to your new year’s resolution list. Not because it’s challenging, but just because the double rise the most breads require – takes. time. Settle into the couch with a movie and a cuppa cocoa. You’ve got your afternoon booked.
My favorite bread to bake is Multigrain bread. It’s chock full of yummy grains, completely melt in your mouth soft on the inside and well it just looks darn pretty on the outside.

Boil 2 ½ cups of water and pour over 1 cup of 7-grain hot cereal. For this recipe Bob’s Red Mill works great! Set it aside for the cereal to cool to a cool, but warm 100 degrees. This is vitally important so when the yeast is added it doesn’t die. 100 is buttah’ for yeast. In a stand mixer bowl (This is the stand mixer I have – Beautiful BEAST) with the hook attachment, pour the warm cereal mixture. Add in honey and yeast and mix gently to combine. As this is mixing slowly add in the flour. When all the flour is mixed in turn on to medium to knead until the dough pulls away from the side of the bowl. When this happens, after about 2 minutes stop and cover the bowl with plastic wrap, letting the dough rest for 20 minutes.

After 20 minutes is up, plop the dough onto a lightly floured surface and knead to form a tight round dough ball. It will take about five or six turns. Push the dough away from you with the heels of your hand, grab it from the top and fold it over on top of itself again. Lather, rinse, repeat and you will see the bowl start to form. Then, place in a lightly oiled bowl rolling the dough around to cover it lightly in oil. Cover again and let the bread do it’s first of two rises. About one hour.
Find a warm place for your bread to rise – I personally found the sweet spot for my bread on top of my dryer as I’m doing laundry. Keeps it just warm and cozy – and hey, multitasking!

Once the bread has risen and doubled in size, you’re ready to shape! Shape and pull the dough out on a clean surface until it reaches a 18″ by 12″ rectangle. With a sharp knife or lame´cut the dough into two sheets of 9″x12″.

Starting from the top down, tightly roll each sheet into a log. When you reach the end pinch the seams all around with your fingers. Set aside and repeat with the other carb-baby.
Next, toss ½ cup of oatmeal onto the surface. Spray each log with non-stick spray and then roll each in the oats to coat. Hooray, rhymes!
Place each log into a loaf pan, gently covering and letting rise one more time – for about 1 hour. Start pre-heating the oven to 350 degrees.
If you haven’t thought about it until now, I’m here to tell you that investing in a pizza stone is a very wise idea. The pizza stone helps distribute heat evenly in your oven, particularly for those of us who don’t have a convection oven. It also helps create that uber crispy crust. I found mine at Sur La Table for about $40, but you can find cheaper ones. Heck, you can go to your local hardware store and source a large piece of terra cotta tile!
Yummmohhhh!
Ingredients for Multigrain Bread Loaves
- 7-grain Hot Cereal
- Boiling Water
- Honey
- Yeast
- Salt
- All Purpose Flour
- Whole Wheat Flour
- Butter
- Oatmeal
- Non-stick spray

Bake away for 35-40 or until the center of the bread reaches 200 degrees. Turn each loaf out of the pans immediately and allow to cool on a wire rack. And sit on your hands if you must to resist the urge to dig in too soon. I know, toughest thing EVAH. Slice when almost cool and slather in buttah, baby. You know you wanna.
For additional carbolicious food nerd things – check out Comfortably Domestic’s Food Nerd Friday on the differences in Flour and Alternative Flours
Inspired Homemade Recipes To Try
Ultimate Pumpkin Cinnamon Rolls

Are there any other How-To’s you want to see here on How-Tuesday?! Leave a comment below!
For other carb-olicious recipes check out:
Rosemary Olive Oil Bread – Table for Two
Irish Soda Bread – Gimme Some Oven
Braided Cardamom Bread – Comfortably Domestic
Caramelized Onion Cornbread – Baked By Rachel
Print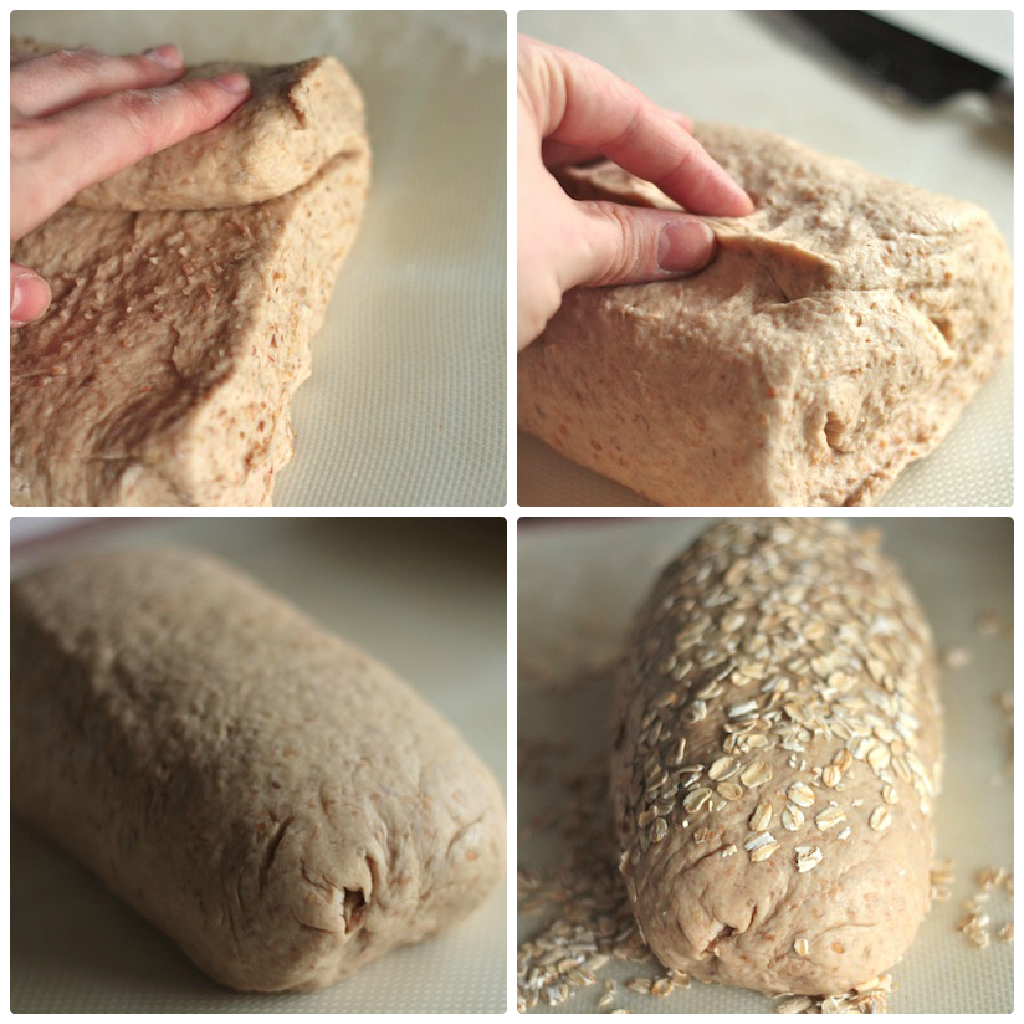
Multigrain Bread Loaves
- Prep Time: 2 Hours 30 Minutes
- Cook Time: 35 Minutes
- Total Time: 3 hours 5 minutes
- Yield: 2 Loaves 1x
- Category: Bread
- Method: Oven
- Cuisine: American
Ingredients
- 1 cup 7-grain Hot Cereal, such as Bob’s Red Mill
- 2 1/2 cups Boiling Water
- 1/4 cup Honey
- 1 package Yeast
- 1 Tbsp Salt
- 3 cups All Purpose Flour, 15 ounces
- 1 1/2 cup Whole Wheat Flour, 8 1/4 ounces
- 4 Tablespoons Butter, melted and cooled
- 1/2 cup Oatmeal
- Non-stick spray
Instructions
1) Boil 2 ½ cups of water, pour over 7-grain hot cereal. Stir and let set until temperature cools to 100 degrees (very important it is no hotter). About 1 hour.
2) Into stand mixer bowl fitted with dough attachment, pour in hot cereal. Add in honey and yeast. Turn on mixer and stir to combine. Lastly add in melted and cooled butter. Slowly add in flour. Knead until all ingredients combine. Cover with plastic wrap and let rest for 20 minutes. Add in salt. Knead again until salt has been combined – about 1 minute.
3) Remove dough from mixer bowl, and onto a lightly floured surface. Flatten and knead until dough shapes into a large ball. Spray down a large bowl with non-stick spray. Add dough to bowl and roll around bowl gently to ensure it is coated with spray. Cover with plastic wrap and towel to keep away light. Set aside in a warm place for one hour. (I set mine on top of my dryer as its going. Just an fyi.)
4) Remove risen dough from bowl and place on lightly floured surface. Pull and stretch dough into a 18×12 inch rectangle. Using a sharp knife divide in half so it measures 2 9″x12″ sheets. Starting from the top, tightly roll each dough sheet into a log. Flip and pinch all ends together with thumb and forefingers. Repeat with other dough log. Temporarily set aside.
5) Sprinkle oatmeal out onto surface. Spray each dough log with non-stick spray and roll in oats to coat. Gently set into two loaf pans. Gently cover with plastic wrap and set in warm place to rise a second time. Let rise for one hour.
6) Preheat oven to 350 degrees. If you do have a pizza stone, it is a good idea to put in oven and let come to temperature – not necessary, but does make crusts of bread extra crispy and helps distribute heat evenly in the oven.
7) Unwrap loaves and bake for 35-40 minutes or until the center of the loaves reaches 200 degrees. Remove from loaf pans and let cool on wire rack for at least 3 hours. Slice and devour.

My goal is 2013 is to try baking bread for the first time!! My husband is an incredible baker and as a result, I usually leave the baking to him. But this recipe is gorgeous and I want to do it! Thanks for the push.
I have bread rising at the moment! 😉 ATK always has the best recipes… looks fabulous! loving your photos! 🙂
I don’t think you can ever spend too much time learning the basics so I’m really excited for this series! Your bread looks utterly perfect and really delicious.
Your loaf looks GORGEOUS! Super easy-to-follow how-to, too 🙂 Love the idea of this series!
I know I will love this series. Multi-grain bread is my favorite, but I never make it! Trying this soon.
I am so excited for this series!!! And holy cow girl – that bread looks amazing! I definitely fall into the category of yeast-intimidated, but I really want to get better. You’ve inspired me to see if I can make yeast my little carbon dioxide emitting minion. 😉
Thanks for this post!
Nothing like fresh bread right out of the oven, what a pretty loaf!
I love this idea, I think there are a lot of basics that people just don’t know and having a series is a great way to broaden everyone’s horizons. Also, this bread looks fantastic!
I’m liking this project already. It’s funny, I’m no good at bread, but I kind of want to be, and I even thought about making “learn to make bread” and official resolution. I’ll for sure come back to this!
Gorgeous bread, Megan! Multigrain ins my favorite “everyday bread” too. I just love those chewy grains in a fat slice of buttered toast. I’m really looking forward to this series!
I love this! Gorgeous bread. I have made many yeast breads, rolls, cakes etc. Not afraid of the yeast. I have found that whenever an item flops the yeast wasn’t the freshest – even if the expiration date on the packet is still a ways off I try to find yeast that expires well over a year from when I buy it.
I want to learn croissants, how to make my own puff pastry ( regular and gluten free) and phyllo dough. I remember my grandnother making apple strudel from scratch, stretching the dough out across her dining room table, and baking up the best strudel ever. I have a bunch of things on my baking/cooking “bucket list” this year!
I officially love this series already! I still have got to make homemade bread.
Perfect timing on this, and I would love it if you would tackle pie crusts for me. That is the one thing that I have litterally thrown across the kitchen when I became so frustrated with the stupid thing. Between sticking to the counter and shrinking down the side of the pan when blind baked, I have just about given up.
Pingback: Food Dork Friday…er…Saturday: Alternate Flours for Baking « Comfortably Domestic
Pingback: Food Dork Fridays: Flour Power! « Comfortably Domestic
And here I thought I was becoming pretty savvy in the bread department. Buuut I just learned something. How to shape the loaf! Loving this tutorial, and this bread looks divine.
How did you know I have been wanting to make some healthy bread?! Yours came out perfectly!
Your bread is absolutely gorgeous!! Looks so fluffy and light. Love the idea of How To Tuesday!
I’m absolutely loving these series! And this bread – YES PLEASE! I can imagine just slathering on some freshly made jam on this for breakfast – YUM!
This is stunning. Well-done on the new series!
Love it love it, esp since I’m a carb addict. This looks sooo good, and less ingredients that most bread recipe. Hooray!!
Gorgeous… gorgeous… GORGEOUS! Love the new series Megan!
I swear I can taste that! Scrumptious looking!
This looks like the perfect loaf of bread!! I’ll definitely be trying this soon, I’m drooling.
Your loaf looks perfect, absolutely perfect! I want to slather it in butter and jam! Can’t wait to make a loaf of this bread – my family adores homemade bread and would snap this up in seconds!
Did you leave the pizza stone in the oven while you backed the bread, or it just helps distribute the heat beforehand? Can’t wait to try this recipe!
Hi Ashley – Yes, keep the stone in the oven and you can place the loaf pans directly on the stone. If you don’t have on, this is a recipe that works just fine without the stone. Breads like baguette, and boules are great with a stone, this one can go either way – but it’s Fantstic to have around the house for even baked goods 🙂 ~Megan
Do you place the pans directly on the pizza stone, or put them on the rack above the stone……?
Hi Susan – Yes, place the pans directly on the pizza stone. It will be just fine. Preheat your oven and pizza stone for at least one hour if you are using a stone so that the stone comes to temperature properly. GREAT Question. Good luck!
Thanks for the clarification….gonna make this tonight!
Susan – I hope you haven’t made this yet – I forgot one ingredient and I didn’t want you to miss it – it’s 4 Tablespoon os melted and cooled butter!! So so sorry, making the addition to the recipe now!
Was just going to pull up the recipe again…..so glad I check my emails first. I’ll let you know how it turned out.
Love this!! I would love to start making my own bread. Yours turned out beautiful.
This looks great! I love homemade bread and have been looking for just the right recipe for multigrain bread. I can’t wait to make this! Thanks Megan, I think this will be a great series.
I was a baker for years but now I just don’t make enough yeast products at home. I feel some CC inspiration brewing. I wonder what I could make?? Your loaf looks darn perfect!
Pingback: Weekly Rewind~Back to Work Edition | Herbivore Triathlete
Pingback: Friday features | tiny dancer | sunnysideup
Pingback: Country Cleaver Brown Butter Chocolate Chip Cookies - Country Cleaver
Stunning bread! I have loved learning how to make bread the past year and yours is just stunning. White bread is easy; wheat or multigrain can be tricky and yours is so soft, fluffy, light, and beautiful!
Love this “How-To”. I have yet to master yeast and am taking a professional cooking class at the end of the month just on bread. So hopefully, after that class I can then make your multigrain bread recipe! I think I’ve failed so many times because I don’t have the patience! lol.
Pingback: Country Cleaver How-To Tuesday - How To Brown Butter » Country Cleaver
I am just now re-reading this to let you know I made the bread this weekend and it was delicious! Re-reading the recipe I just now realized I completely left out the 4 tablespoons of butter, lol. (it tastes just fine btw)
Ohhh that makes me so happy!! Thanks so much for letting me know it was a success – and hopefully this is just the first in a long line of homemade baked bread!
Looks delicious! I have a love hate relationship with homemade bread. I make it every single week but some weeks it doesn’t turn out so great. Even bad it’s better than storebought though!
Pingback: Country Cleaver How Tuesday - How to Roast Garlic » Country Cleaver
Pingback: Country Cleaver How-To Tuesday : Chicken Stock » Country Cleaver
Pingback: Country Cleaver How-Tuesday: Compound Butter and 10 Compound Butter Varieties » Country Cleaver
Pingback: Homemade French Baguettes | My Website
Hi, I bake this bread all the time. I love it and it has always turned out for me, even when I make “mistakes”. But I always forget the butter. Would you mind moving it up above the flours in the list?
I’m so glad the bread always works for you!! That’s the beauty of America’s Test Kitchen, they’re always a hit! I’ve forgot the butter a couple of times, too. I’ll try and move it up on the list. Thanks so much 🙂
ok, but do ya have a good WHOLE WHEAT BREAD RECEIPE?
That would be appreciated GREATLY………make it rather than purchasing it……….I am on a combo cholesterol and diabetic diet.
It would be appreciated.
thanks
Jim
Because of space constraints, I don’t have a stand mixer, only an electric hand mixer. To make this recipe would you advise using my electric beaters, mixing by hand…or not at all? Many thanks!
Hi Karen,
I would suggest mixing it by hand. The hand mixer would tire out pretty quickly and I would hate for your to burn out a motor on bread. Use your hands and get a GREAT arm work out in while you’re at it! Two for one 🙂 Good luck!
Pingback: Multi-Grain Bread | Mom-Makes...
Thanks for the great article; I have been looking for a easy multi-grain recipe and going to attempt this today.
I am teaching myself to bake bread and even recovered after one epic Yeast fail.
Which brings to point, you did not list what type of yeast to use here. I know this may not be important to those tried & true bakers; but I’m quite the novice & the first time I proofed yeast, I thought it was the coolest thing.
Hi Lisa,
So glad you’re adventuring into bread baking! I used a Rapid Rise yeast for this. Red Star Yeast has a great one. Traditional yeast will work just fine, too. It just means it will take longer to rise. Good luck!
Pingback: Country Cleaver Roasted Chocolate Almond Butter » Country Cleaver
I just got into bread-making so I’m excited to try out this recipe 🙂
I have made this bread 3 times now. Lovely recipe. Would you have any idea of the calorie count per slice?
I realize this a loaded question as everyone slices their bread into different thicknesses. Just a ball park figure would be helpful. Thanks!
Hi Tanis, I don’t have any guess as to the calorie count, but there are several on the internet that you can plug the recipe ingredients into and have it calculated. I hope that helps.
Pingback: Rosemary Sea Salt Sweet Potato Rolls - Country Cleaver
Pingback: European Tea Bread - Czech Vanocka + Wolf Countertop Oven GIVEAWAY! - Country Cleaver
I made this bread twice now. First time I experienced a brain fart and forgot the 1 1/2 cup wheat flour. Thought the dough was somewhat loose (duh, ya think) but continued onward with my mistake. Looked good in the pan but it fell in the center during baking. Went back and discovered my “fart.” We ate it anyway. The next day made it again and used all ingredients as posted. LOVELY!! I will make this again no doubt. I did add more seeds like hemp hearts, chi seed mix and flax seed. We like our seeds. Thanks for the recipe.
I’m so pleased that this is a keeper!! It’s a tried and true favorite of ours, too!!
Pingback: A Cozy Home - Homemade Honey Oatmeal Bread Recipe - Dine and Dish
This bread was easy to make and is absolutely delicious! I will definitely be making it regularly. The only problem I had was keeping the oats on the loaves when slicing (most of them fell off.) Thanks for sharing this recipe with us Megan!
I’m so so pleased you and the family liked it Cindy!!
This is a great recipe, I have made it often. I’ve also streamlined it a bit – I add everything (except the flour and yeast) to the cereal as it cools. When it gets to 100 degrees I add the yeast, I even quicken the cooling process using an ice water bath. I’ve eliminated the oatmeal feeling that it looks nice but makes a mess when slicing. I often keep a loaf and give one away.
Thanks,
HJKillian
Jay that is totally wonderful you found a way to streamline this recipe! And even better you can give one away! I’m sure that is such a gift to whomever receives it!
This is a great recipe! I have made many loaves of this bread. When I make it, we eat one loaf and send the other to my daughter on the other side of the country. She loves it, too!
Have you ever refrigerated after the first rise? If so, how long does the second rise take? Thanks Megan!!
Best,
Dave
Hi Dave! I’m so so pleased that you love this recipe! I will have to make it again, too. It’s been far too long! I have not tried refrigerating it on the second rise, but that is a really great idea. I’m sure it will develop wonderful flavors. When I do refrigerate other doughs on their second rise, I usually let them stay overnight and bake the next day. It’s definitely worth a shot. Please let me know if you try it! Best, Megan