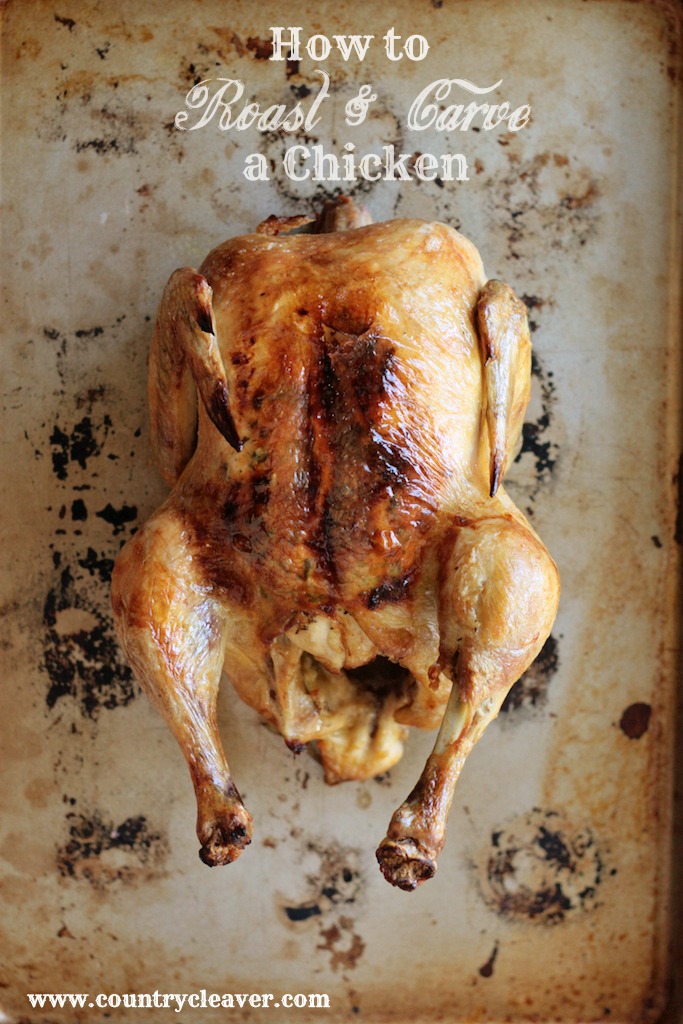
How To Tuesday – Roast and Carve A Chicken
This post may contain affiliate links, that if you make purchases through, I will earn a small commission.
So, funny story about learning how to roast chickens… I avoided it like the plague after the unfortunate “Chicken Incident” that Beka and I experience back in our senior year in college. It happened one fateful late spring evening and I was going to roast a chicken for a guy I was dating at the time. He was super cute, legit cowboy, smelled ridic good and had a beard. I was a goner. The night was planned and I was ready to impress, until he called that night as Beka was wrist deep in the chicken trying to teach me how to roast the damn thing and said he wanted to take me out to dinner instead… So what did I do? Went out to dinner, leaving Beka behind to finish the chicken. Don’t worry – my comeuppance was coming… After a dinner at the nicest restaurant in our college town, a perfect date in every way – I got dumped in the parking lot. Yup. At least he took me out to dinner first??? Yeah, no. It was quite possibly the nicest break up ever, bless his heart, but still – it blew. So once I got home, heart broken, Beka was done with the chicken, it was packed away, she was pissed, I was crying and there was no consolation to be found. The night became known as “The Chicken Incident”. It was the sole reason I avoided learning how to roast a chicken for so long. What a waste of time!! Roast chicken is amazing!! Had he come over for dinner instead of taking me out that night, it might have been a very different story. Or I would have ended up dumped in front of my roommate.
But I think it worked out best in the end – I ended up with this hottie. I still win.


But back to the real point of today – roasting a chicken.
To Roast
There are a few things I stick to when roasting a bird – all of which help with the end results. I swear. One is my adjustable roasting rack so I can shove any sized bird into the oven and have it properly supported – you’ll find out why soon. The next is brining my bird. It’s an easy step, and totally worth while. The last is using compound butter to keep the chicken boobs moist during roasting so you don’t end up with dry boobs. Compound butter is an easy thing to keep on hand and has a ton of uses.
When it comes to brining a bird, all you have to do is mix equal parts sugar and salt into a very large bowl of water. For the large bowl I had, I used ½ cup of each and mixed it until the salt and sugar dissolved. The end results of brining is a moist and flavor packed chicken. Brining isn’t just for Thanksgiving turkies…
Once your brine is mixed, remove your bird from the packaging, and get your husband to remove the neck, liver and gizzards from the cavity. Rinse the bird under cold running water and then place him – the bird, not your husband, into the brine. Place the bird and brine into the fridge for about an hour, turning the bird over half way through the process. Salinity in water has a tendency to be higher at the bottom then the top, so turning your bird ensures it gets equal time in the saltiest parts of the solution.


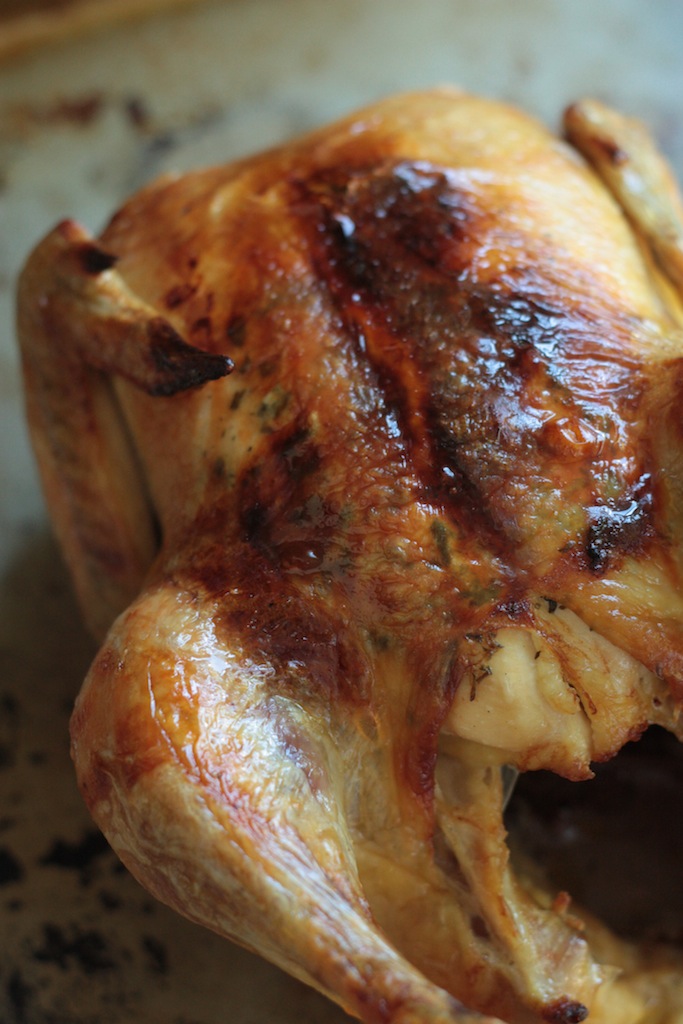
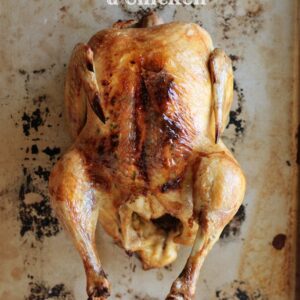
Once the hour is up, rinse the bird under cold water and pat dry with several paper towels. The drier the skin, the crispier the skin will be in the end. Next, flip the bird boob-side up and gently slide your fingers under the skin to separate the skin from the meat of the boobs. Be careful not to poke your fingers through the skin. Slide in a couple of table spoons of compound butter onto each book and fold the skin over. Lastly, brush the bird with a little olive oil and place it wing-side up in your adjustable roasting rack. The reason behind the wing-side-up technique is that the wings will be exposed to the most amount of heat during the first 30 minutes of roasting, helping bring their temperature up quicker. That way you aren’t playing the tedious game of over-cook-the-chicken-boobs-while-waiting-for-the-dark-meat-to-get-done. What a painful and horrible tasting game.
Roast your chicken for 15 minutes with one wing-side up in a 400 degree oven. After that 15 minutes is up, take a couple of tongs and flip the bird to the opposite wing side and roast another 15 minutes. Once that second 15 minutes is up, it’s time to flip the bird boob-side up and roast it for 30 minutes.
Once the boobs reach 160 degrees and your dark meat reaches 170, you’re good to go! Tent the bird with aluminum foil and allow it to rest for about 10 minutes. This is important so the juices in the bird redistribute. Always wonder why there is a puddle of juice when you slice into your bird right away? This is why. All of those flavor filled juices are poured out from the bird onto your cutting board, which means they’re not in your bird anymore! Let it rest, it is sacra-saint.
To Carve

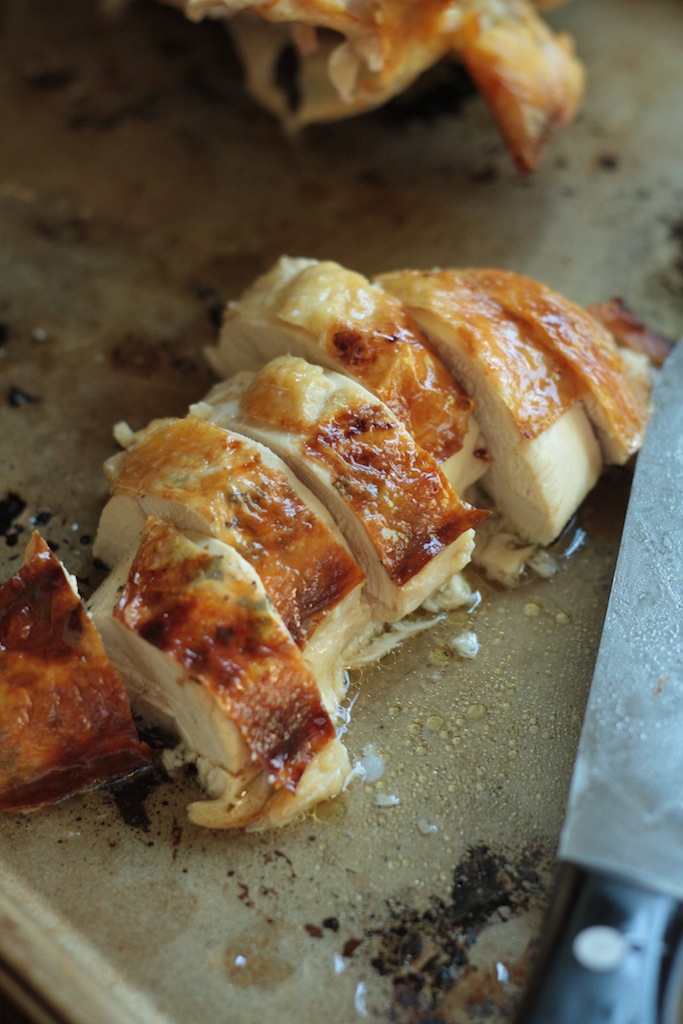
After your purdy bird has sat and rested you’re ready to carve and serve. Once it’s all cooked, the carving part is a cinch. The joints are lose (gross to think about I KNOW), and you can slice right through them with ease. First hold onto the leg of the bird and gently pull it taught so you can start to slice right through, shown above. The bone will likely pop right out and you will keep cutting all the way down following the rib cage of the bird coming to the thigh joint. Place your knife at the joint and wiggle it through until it releases. It should come off all in one large piece.
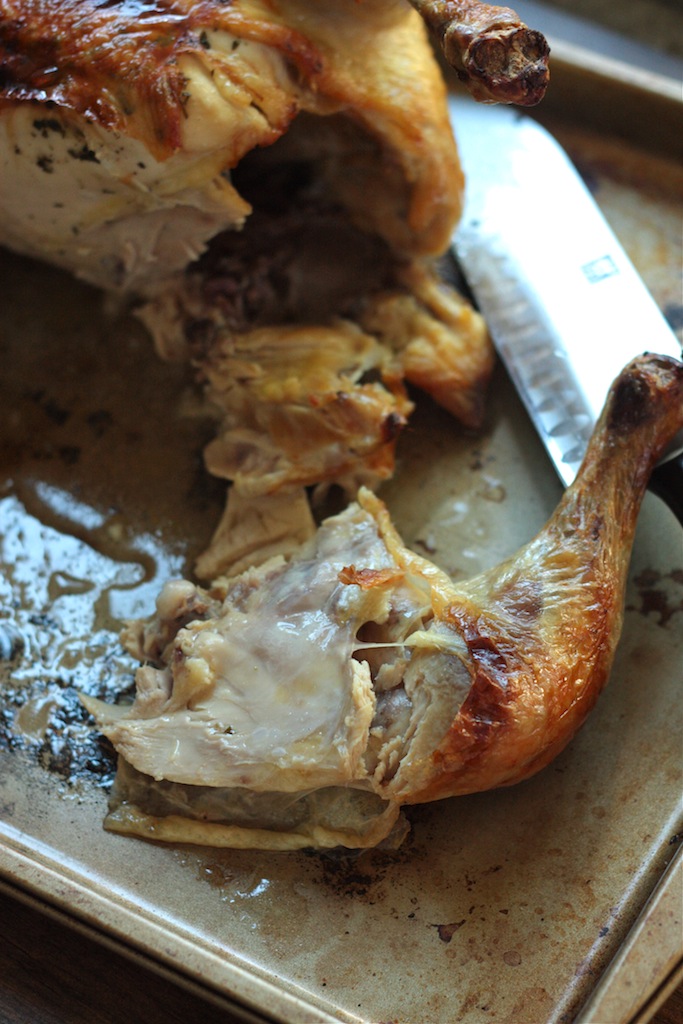
Repeat with the other leg and thigh section.
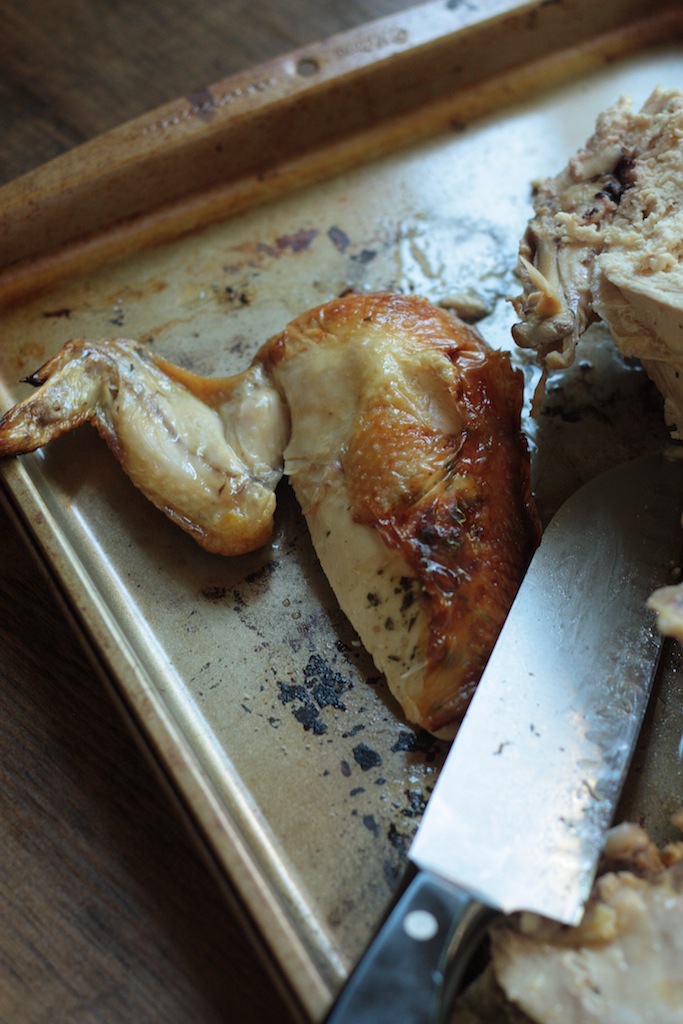
To carve the breast next you’re going to follow relatively the same procedure. Start just off from the center line of the breast bone.With long full length slices, use the whole blade of the knife, cut down and along the rib cage of the bird. The same thing will happen as it did with the leg and thigh, the breast and wing section (when you cut all the way through) will come off as one section. To separate the wing and the breast, find the joint that holds the two together and use the blade of the knife to pop them apart.

EASY!!
Once the wing and breast a separated, you can elegantly slice your chicken boob with crispy skin and plate your bird to serve. This is one of those recipes that is worth every step you put into it. And I can guarantee – it’ll be better than any rotisserie bird you can buy from the grocery store. A bird sitting under a heat lamp for 17.13 hours or a bird straight out of the oven? I think the answer is simple.
Ingredients for Simple Roast Chicken
- Sugar
- Salt
- Water
- Butter
- Garlic
- Rosemary, Thyme, Oregano, or other Herbs of your choice
- Chicken
- Olive Oil
Need more How-To’s? Check these out right cheer!
How to Compound Butter – used in today’s recipe!

Simple Roast Chicken
- Prep Time: 1 hour 15 minutes
- Rest Time: 10 minutes
- Cook Time: 1 hour
- Total Time: 2 hours 25 minutes
- Yield: 1 chicken 1x
- Category: Main Course
- Method: Roasted
- Cuisine: American
Description
A quick 1-hour brine creates a moist and flavor packed chicken, and compound butter keeps the moisture in while cooking.
Ingredients
- 1/2 cup Sugar
- 1/2 cup Salt
- 1 gallon Cold Water
- 3 Tbsp Butter, softened
- 1 tsp Garlic, minced
- 1/2 tsp each of Rosemary, Thyme, Oregano, or other herbs of your choice
- 1 4 pound Chicken
- 3 Tbsp Olive Oil
Instructions
- In a large bowl, whisk together sugar, salt and water until sugar an salt dissolve. Remove chicken neck, liver and gizzards from inside cavity of the chicken. Submerge into the salt water brine solution. Place in fridge for 1 hour, flipping the bird half way through the process.
- Pre-heat the oven to 400 degrees. Place an adjustable roasting rack into a large baking sheet or baking dish.
- Remove chicken from brine and rinse under cold water. Pat very dry with several paper towels. In a small bowl combine softened butter, garlic and other herbs of your choice, stirring to combine.
- Using fingers, separate the skin covering the chicken breasts from the meat of the breasts. Using fingers rub the butter between the skin and the chicken breast meat, evenly over both breasts. Pull skin taught to cover the breasts.
- Place chicken onto the roasting rack with the wing side up. Base bird in olive oil. Roast with wing side up for 15 minutes.
- Using tongs or wads of paper towels, flip the chicken so it is sitting with the opposite wing up in the roasting rack and roast for another 15 minutes.
- Flip once more, so that the breast side is facing up – and roast bird for 30 minutes, or until the breast meat registers 160 degrees and the dark thigh meat registers 175.
- Remove from oven and tent chicken with foil. Let rest for 10 minutes.
- Carve the bird and serve immediately.
Notes
Adapted from America’s Test Kitchen Simple Roast Chicken

Such an informative post!! Everyone NEEDS to no how to do this!! I especially like the carving part because you do not want to see what I have done to a chicken. Lets just say it was not pretty!
Thanks for this!!!
Omg – The Chicken Incident!!! That is hilarious. Great post!!
Oh my goodness – college dating!! Two thumbs down to this guy, but glad all worked out in the end with you and your BFF. 🙂 And glad you finally learned how to roast a chicken! I’m guilty of picking up rotisserie chickens most of the time, but this inspires me to do more roasting at home!
Um yes, you are much neater at the “Carve” aspect than I was. Let me just say, a caveman would have fit in nicely the last time I carved a chicken 😉 Now I’m going to reference back to this little guide the next time around!
This is such a great how-to post! I’ll have to bookmark this one. Hilarous about the “chicken incident.” Hey, at least he took you to dinner instead of text-dumping you! lol
Yeah, I think that would put me off roasting chickens for a while too. I’m so glad you overcame that though because this is such a useful how-to. I almost always leave carving a chicken to someone else but I really need to learn how to do it myself!
Amazing post, Megan. I didn’t roast my first chicken until after we got married…because we got a roasting pan for a wedding gift! I love it!
I can’t ever get it right! I just make Aaron do it. And I call it “the bird” over and over and over in a high-pitched voice. It’s so cute!
My uncle is the king of carving a bird. It’s seriously the most impressive thing I’ve ever seen. I swear there’s only bone left when he’s done. Blows my mind every time. You’re seriously making me crave chicken and it’s not even lunch. 😉
I’m new to your site (<24 hrs!), but really like what I've seen, and thanks for your speedy, helpful info on stand-less-mixer bread baking! I'll be making a few loafs as soon as my wrist heals from super-scrubbing 2 brand-new restaurant-supply stainless steel pans I bought to roast veggies (perhaps why I can't fit a mixer in my kitchen, but that's another story…) Here's the deal: the roasting causes the splotchy blackening similar to what I see in your chicken-roasting pics. Since they were new, I decided to start a non-slouchy leaf and scrub-scrub-scrub till they looked (almost) the way they did before the roasting. How do you keep your pans? Does it matter to get every speck of that "roasty color" off? I don't really care about the cosmetics, but I'm not sure if it's healthy. I'm over-hauling my kitchen to purge it of non-stick bakeware because I dislike the peeling-coating, and gumminess that results when fats are cooked in them. I'd love to learn of you and others' thoughts/experiences on this subject.
The chicken tutorial is great! I have an aversion to poultry, and probably won't be going there soon, but I'll know where to turn if any of "my people" demand roasted bird, or I develop a taste for it myself–stranger things have happened!
Hi Karen,
I hope your wrist feels better soon! That’s a lot of heavy duty scrubbing! I have a couple of different pans for different needs. The ones you see in those roasted chicken photos are my “grungy” pans that do the majority of the roasting and fatty cooking/roasting. They are also my Photo pans, cause I’m weird and I love how those splotches look in photos. 🙂 I do have a stainless steel muffin tin, but really I kinda stopped using it once one too many muffins over filled and baked onto the pan.
If I’m roasting or baking on a type of pan that is prone to baked on gunk and leaving splothes, I line it with a silicone liner like a SilPat or aluminum foil sprayed with non-stick spray, like canola oil. That wya it’s minimal mess and I can throw away the foil without ruining my pan. I’m totally lazy and hate scrubbing.
The majority of my bakign sheets and jelly roll pans are Wilton. They’re cheap enough to replace when needed so I don’t have to worry about throwing away a super expensive pan if I ruin it with baked on stuff. The baked on stuff won’t hurt you, but don’t go give yourself carpel tunnel trying to remove it all. Save your wrists for bread kneading 😉
LIFE SAVER!!! I never knew the proper way to cut up a bird. This how-to rocks my world!
I’m sure that if that boy had found out what an awesome cook you are he would have never left. In fact, you probably would have had several frat houses worth of boys lined up at your door! Heck, I’m in love with you just from READING about your cooking! (jk – I’m married).
Hahaha Thanks David 🙂 I think it all worked out just the way it was meant too, Ben is stuck with me for life now – so good or bad cooking, he’s gotta eat it.
Awesome, awesome tutorial, and you have no idea how much I need help with this! Every time I try it ends up looking like roadkill. Your chicken looks beautiful!
Dear Megan,
I already had surgery to both wrists for carpal tunnel–very successful–but yeah, I’ve been given my notice by the recent scrubbing I gave those pans! I’ve read about using aluminum foil for roasting, but I like to run a sturdy metal pancake turner back and forth under my veggies a few times during the roast to encourage even cooking, and spread the carmel-y yumminess all over– which wouldn’t be as do-able with foil underneath. Just so the residual gunky stuff is safe, is my main concern. I too like its look!
How-To Tuesday is fabulous! Saving this guy for holidays or special occasions when I usually chop it all to pieces b/c I never knew the right way to do it 🙂 Thanks!
Oh man that is a funny (and sad…) story 😉 I had a very different “Chicken Incident” that makes me steer clear from whole chickens for the time being. But when I can finally come around to doing it again, I need to make that compound butter to roast it with. Your chicken is gorge!
Haha you said boobs 🙂 In all seriousness I’ve never had per say a “chicken incident” but it scares the living daylights out of me anyways. You make it looks so easy!!!
You have mad chicken carving skills lady! When i do it, I butcher the meat.
I’m digging your mans suit, I don’t have the courage to go light color. Great chicken roasting story..psshht to the cowboy!
We found that suit for him at JCP of all places!! Total win. EVERY guy can look good in a tan suit.
Love that you call them boobs! 🙂 This bird is a thing of beauty. My carving skills must not be that great, because mine never looks that good.
Oh no! Terrible story, but great at the same time. At least now 😉 Thank you for sharing this — I have never understood how to do it and it seems overwhelming to me. MUCH more ‘doable’ now.
Love the how to , very informative
Well it’s only appropriate that the “cleaver” herself would show us how to do this perfectly! Absolutely mouthwatering roasted chicken (my favorite meal ever) and great tutorial, Megan!
I’m so glad you posted this. For some reason, carving a bird just overwhelms me!
SO few people actually know that is right way to carve to breast, most people just leave it on and slice at it. Great post! and it’s totally Cowboy Guy’s lose.
GORGEOUS GORGEOUS GORGEOUS Meggers, and I know all those photos took some effort. And high five to Beka for being an awesome friend 🙂 I mean like, in the end. Like after the Chicken Incident.
Pingback: Friday Features | baby face | sunnysideup
You did a wonderful job 🙂 this looks perfect!
I sure love me a good roast chicken. I even just found a recipe for roasting it in the crock pot….hmmmm… Yours looks amazing, so I think I’ll give it a go. Love your site. This is my first visit of many.
Teresa
Pingback: So, How's It Taste? » Chicken Carbonara
Pingback: Country Cleaver Cookies for Crohn's Bake Sale Preview » Country Cleaver
Pingback: Country Cleaver Stuffed Turkey Roulade » Country Cleaver
Pingback: Country Cleaver Mini Southwest Chipotle Turkey Pot Pies with LeCreuset & OXO Giveaway! » Country Cleaver
Pingback: Country Cleaver 31 Thanksgiving Recipes for Your Turkey Day » Country Cleaver
Pingback: Wish List: Chicken | Cake Over Steak
Pingback: How To Tuesday :: How to Prepare a Cheesecake Water Bath Country Cleaver
Pingback: Fifty Whole30 Compliant Recipes for Your New Year! - Country Cleaver