DIY Frozen Hash Browns
This post may contain affiliate links, that if you make purchases through, I will earn a small commission.
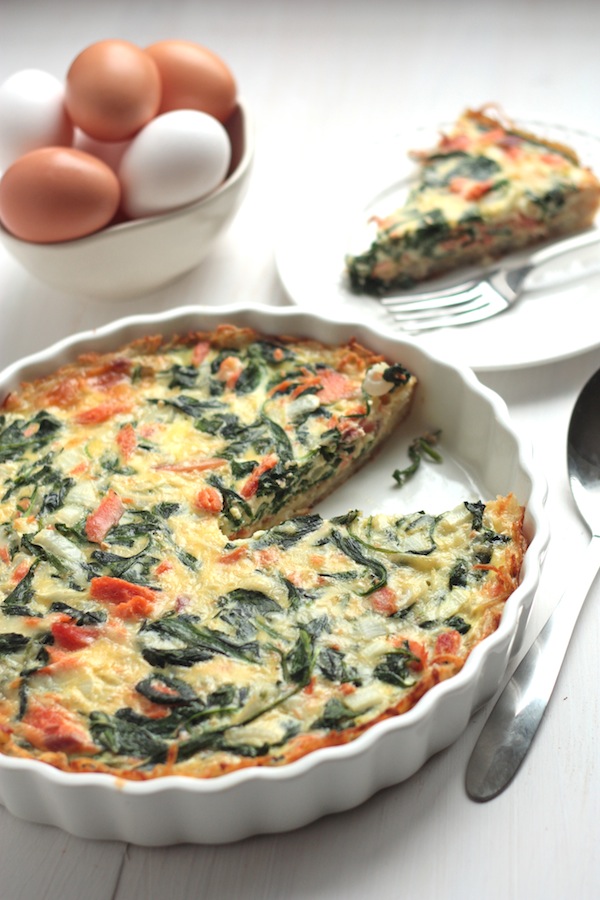
There aren’t many more things more incredible on the weekend than a big cup of coffee, watching the news and a giant plate of scrambled eggs with salsa, toast with jam and a mountain of crispy brown hash browns. I can’t be the only one living for the weekends here friends! DIY Frozen Hash Browns make me unequivocally happy.
If we ever go out for breakfast together on the weekends, the hardest decision for me to make is to get a sweet breakfast, like waffles or crepes, or a savory breakfast like a breakfast burrito. Once I have that life altering decision made, I’m all set. When I go the savory route – it must, must, include a heap of hash browns.
Prepare the diving board friends, I’m going in!
I don’t care how you top them, with salsa, ketchup, or just salt and pepper – but hash browns and me are like BFF’s. And if you like hash browns, we can totally be BFF’s, too.d
Now, if you’re not in the mood for going out – here is how you can make your very own DIY frozen hash browns at home! Seriously, they are better than what you can get out of a bag! And, did I mention that they are a fraction of the cost?! Well, they are.
Start to Finish these take 20 Minutes! That’s worth your $6.99 for a pack of taters. So if you’re in the mood to save some dough, give these diy frozen hash browns a try!
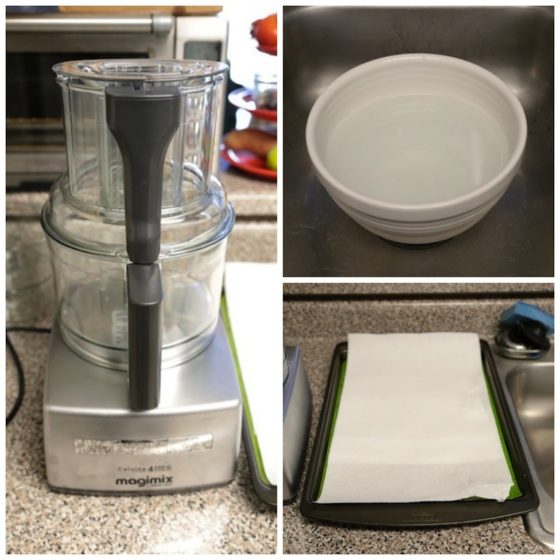
Step 1:
Get the following
- 3 pounds of potatoes. Working in smaller quantities is a must – unless you have unlimited freezer storage space, which I do not. And I use Idaho Russet Burbank Potatoes. They are the best!
- Two Large Mixing Bowls – Fill them both with cold tap water.
- A Vegetable Peeler – To peel your spuds.
- Food Processor with grater attachment or a cheese grater
- A roll of paper towels
- Parchment Paper or a silicone baking mat
- Large rimmed baking pans.
- A Gallon Ziploc Bag

Step 2:
Peel and place potatoes into large bowl of cold water. This helps rinse the excess starch off of the potatoes. Starch inhibits the browning process, so loose starch is bad starch.
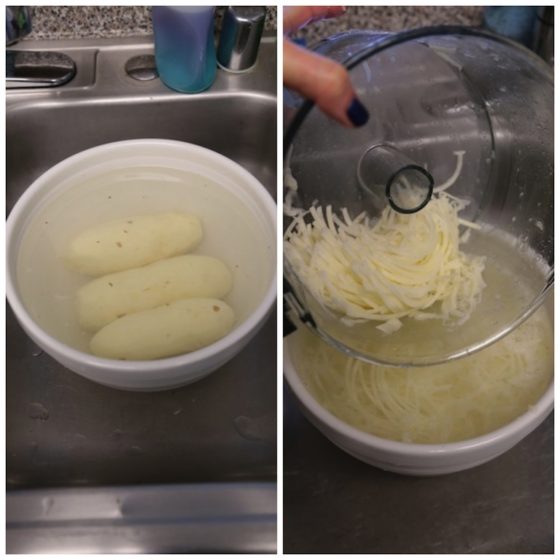
Step 3:
Grate your potatoes in your food processor or cheese grater. Transfer the shredded potatoes immediately into the other bowl of cold water. If you’re using a cheese grater, consider grating the potatoes directly into the other bowl of water.
Leaving the potatoes exposed to oxygen will oxidize the potatoes and start to turn them red or black. No Bueno.
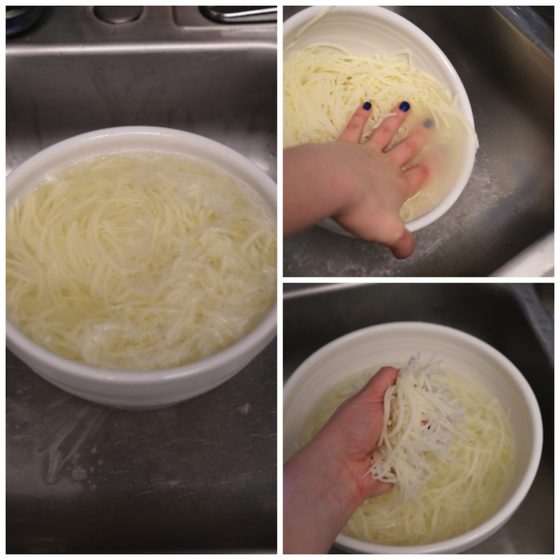
Step 4:
Rinse your spuds. You can let them sit for a few minutes in the water. Using your clean hands, agitate the spuds in the water to make sure they are getting rinsed of all the excess starch. The water will turn almost white with all the starch. Then, drain the water from your shredded potatoes, fill the bowl with water again and repeat. This took me about three rinses before the water started coming out clear.
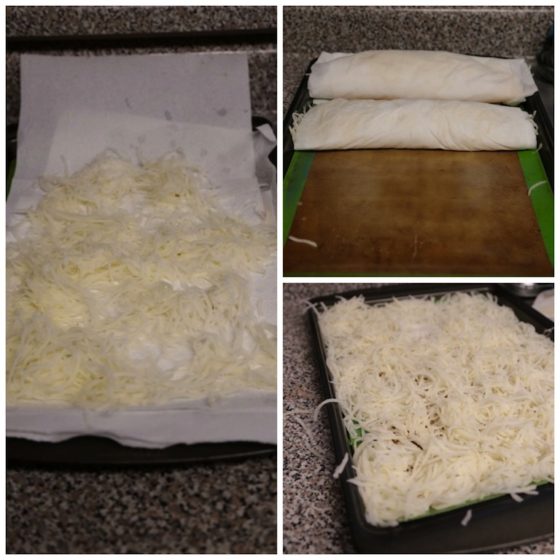
While the potatoes are sitting in the water, finishing their “rinse cycle”, line your baking sheets with your silicone baking mats and then several layers of paper towels.
Step 5:
Once your final rinse is complete, grab handfuls of your shredded russet potatoes, squeeze them of any excess water and spread evenly on the paper towels.
Starting at one end of the paper towels, roll the towels and the potatoes together and gently squeeze the roll to extract as much water as possible. Then unroll, and spread the potatoes onto the silicone mat. Make sure the potatoes are in a single layer and not big clumps. Just like when you were shredding potatoes into the water, the potatoes have to be spread thinly so when they get place in the freeze, they freeze as quickly as possible and aren’t exposed to too much air. Remember, air bad because it leads to oxidization.
Step 6:
Immediately place them in the freezer. This is where it’s handy to have your freezer organized so you don’t have to fuss with it when you’re trying to place the spuds in to freeze.
Let them freeze for about 2 hours. Once they are nice and frozen you can pour them into a freezer zip lock bag for later use. Mine last about a week or two.
Step 7:
Make them!!
Keys to perfect hash browns:
- Pre-heat your pan.
- Use butter for frying hash browns.
- Don’t turn them too often!
- When it doubt – let them fry longer.
Ty out these other How-To’s of the past to hone your cooking skills and impress all your friends and family.
Perfect Salted Caramel Sauce – This #HowToYOUsDay is open now – so make it this weekend and be entered to win $50 to Williams-Sonoma!

Oh so clever! Love the idea of having a stack of these on hand for whenever the savoury-breakfast craving strikes.
This is awesome, Megan! I love the idea of making homemade hash browns!
Making your own hash browns, how fun!
This tutorial is going to prove dangerous. I see perfectly crispy hash browns in my future, often. Like, every day .
This is genius! I need to do this asap!
We like to make fresh hash browns on the weekend for breakfast. I HAVE to HAVE them as well if I’m doing a savory breakfast.
I don’t think I’ve ever met a potato I didn’t like. Hash browns are one of my favorites. This is a great idea!
What a smart idea! We love hash browns so much!
Hash browns are my breakfast indulgence. There’s nothing better than super crispy potatoes with a good dose of melting butter and black pepper. And ketchup. I’m a ketchup girl!
I love the idea of making these hash browns ahead of time, but did I read correctly that these only last a week or 2?
Hi Lucy – They can last longer in the freezer. But because oxygen has a tendency to effect potatoes and cause them to turn color, repeated opening and closing of the freezer can have an effect on the spuds – even when they are in a freezer bag. I’m working on a lemon juice or vinegar spray to see if that will help preserve the spuds for longer and prevent the oxygenation. I will update this how-to once I perfect it!
Do these start go to bad after a week or two in the freezer? That would be disappointing. I guess I could make them and cook one batch right away and put the other batch in the freezer for the next weekend. For making them right away, does the starch need to be rinsed off? And for cooking – just pan fry in lots of butter? Thanks!
No problem Amy! I’m glad you found the additional steps! Also – these keep for about a week or two only because the oxygen that courses through your freezer will start to turn some of the edges of the potatoes. I’m testing out ways to make them last longer as well – like by using a light spray of lemon juice or vinegar to prevent oxygenation. I will update this How-To when I perfect the sprays!
PS sorry – somehow I skipped step seven before 🙂
Thanks for the info, it makes a lot of sense now that I think of it.
Pingback: Last Thing Thursdays
I’m planning at the spread them on the pan of loosely packing them in the zip locks onto the pan and getting as much air out of the bags at that point as the exposure to air during freezing will also make them turn brown. Also try soaking them in vinegar ed water on the very last rinse to see if it helps.
About how many people do you think 3lbs of potatoes would feed for this recipe as a brunch side? Y’know, for like “normal” servings, because for *true* hash brown lovers the answer “get your own”.
Hey Mike, Because potatoes reduce so much when they’re turned into hashbrowns, I would say 3 pounds would serve 4 “normal portions”. But I’m with the true hashbrown lovers here – so stock up! 🙂
before cooking them, do i defrost them first?
This is a great instructional. I believe the freezer/shelf life can be greatly extended by blanching the potatoes for 2-3 minutes in boiling water. Aside from ice cream and ice cubes I can think of no food which will be eaten within a week that would require freezing.
Any word on a way to make them last longer? Thanks, Megan!
Could the rensing and starch problem be avoided by boiling potatoes part way?
That would be a worth while experiment to try! If you do give it a go, please come back and report what you found out!
Just a head’s up, blanching the potatoes will let them last up to a year in the freezer. Just throw them in boiling water for about 3 minutes, and then immediately plunge them into ice cold water to stop the cooking process. Then dry the potatoes extremely well and freeze. I like to freeze them in single layers on baking sheets and then put them into freezer bags when they’re already frozen (makes it easier to cook because it’s not just a big frozen hunk of potatoes when you go to cook ’em). Also! You can do a light dusting of flour before freezing, which slightly helps prevent them from sticking together (and, of course, browns really well too!).
what temp do you fry your hash browns at mine usually end up sticking and not crisping. I use a well seasoned cast iron pan. Also wondering if a light cornstarch dusting (instead of flour we are Gluten Free) would help from sticking together
Your social media icons on the left side of the screen make for very difficult reading of things at your site.
Oh thanks for letting me know, Carrie!
We love to get our hashbrowns crispy on both sides, then at the last minute throw some grated cheese, taco meat, avocado, onion, whatever you like, on one side of the top side and fold the hashbrowns over omelette style, and enjoy! We’ve done this with a variety of fillings, (the ingredient we use every time being cheese!) Takes hashbrowns from breakfast to lunch or dinner!
Have you tried the lemon juice yet.? Mine have turned grayish.
I vacuum pack alot of things and was wondering if, after freezing on the cookie sheet, you could vacuum pack the hash browns in serving size, therefore not always opening the zip bag when you wanted a serving. I think I will try this and see what happens.
I hope this works, it sounds like a good idea!
My husband is the breakfast cook on weekends and he always goes all out and makes it big. So we eat a lot of hashbrowns. I love that its so easy to make these. Now I just need to remember to keep them stocked in the freezer 🙂
Pingback: Easy Sausage Hashbrown Breakfast Casserole | A Mind "Full" Mom
Did you have very good results with vinegar or lemon juice? Would you think fruit fresh or pickle crisp would work? I just would like my hash browns to last more than two weeks. Have you tried vacuum packing them?
Hi Susan,
I have not tried to vacuum pack them, as I don’t have one. But it may be worth a try!
I found your page by A Mind Full mom blog. I made homemade shredded potatoes the other night for a pork and cheesy French fried onion casserole. I had one problem, I did do all of these steps and of course my potatoes tasted starchy. I saved this blog of yours and will BE using it!! Thanks for the tips!!!!