Irish Cream and Chocolate Silk Pie
This post may contain affiliate links, that if you make purchases through, I will earn a small commission.
Does anyone else find pie making to be one of the toughest part of holiday baking? It took me eons to get past the making of my own crusts – because let’s not beat around the bush – store bought were the saviors of my pie experimentation. Not only were they always fail proof, they didn’t require me beating my head into something hard to erase the memories of my failure. And everyone thought I was The Master, which I gladly accepted despite living this egregious lie.

Then all these years later – one pie crust changed my life. It went together in a food processor, took four ingredients and came out flakey and golden brown every time – but no matter what I did, shrinkage happened. And this isn’t just this pie crust in particular – for all intents and purposes it is perfect, I just lacked a few basic tips and tricks to make it, or any pie crust or any kind, uber perfect.
Dang you Martha Stewart and your unreasonable perfection that everyone wants to emulate but no one can!!
So I set my eyes to the Twitterverse and tried to find out what went wrong and how to fix it. Boy was my patience ever rewarded –
Tip Numero Uno – Once your dough is rolled out and in the pie pan – put it back into the freezer for 15 minutes. That will help the butter fats solidify and won’t buckle and sag, at least nearly as bad as a room temperature pie crust going into the oven.

Trick Numero Dos – This trick is all me, but I hate rolling out dough on overly floured surfaces – so I roll mine out on my Silpat. It’s not juts for cookies baking! It cuts down on the amount of flour you have to use and you won’t get the flour equivalent of popcorn lung in the process!
Then once it’s ready to go into your pie dish, just invert the Silpat and peel it back to leave the pie crust right where its supposed to go! Viola!

Trick Numbero Tres – When measuring your pie crust for your pan, take into account the depth of the dish as well as the diameter of the pan. A 9 inch pie plate with 1 ½” tall sides will need a crust that is rolled out to 12″ in diameter to fit into the pan. But if you want nicely crimped edges and enough over hang of the crust so it rests over the edge of the dish and resists shrinking – roll it out to about 14″ instead.
The more over hang the less it will shrink into the pan, staying put firmly around the edges of the tin or dish.
Trick Numero Quattro – Use a fork to poke small holes into the pie crust to allow it to vent while baking. And use foil and dried beans or metal pie chains to prevent further puckering of your crust while baking. The best part about the chain being that you don’t have a million and five individual beans or ceramic weights rolling around or falling onto the floor for your labrador to devour thinking its food… No, I don’t speak from experience…

Number Five – Who really cares what the crust looks like – falling down around the edges or not – pat yourself on the back because you made a pie crust yourself and that is totally something to revel in. As long as its tastes amazing, no one really cares what it looks like. Am I right? Duh.
Ingredients for Irish Cream and Chocolate Silk Pie
1 Pie Crust:
- Flour
- Butter
- Salt
- Ice Water
For Pie Filling:
- Heavy Cream
- Eggs
- Sugar
- Water
- Semi Sweet Chocolate Chips
- Vanilla Extract
- Butter
- Irish Cream liquor

Now – go get your pie on!!
Inspired Homemade Recipes To Try
Blackberry Pie No Churn Ice Cream
Deep Dish Strawberry Crumble Pie
Print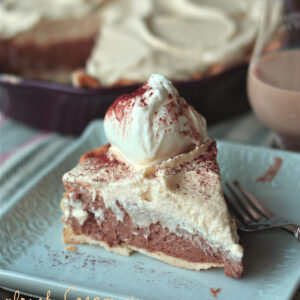
Irish Cream and Chocolate Silk Pie
- Prep Time: 40 minutes
- Cook Time: 40 minutes
- Total Time: 1 hour 20 minutes
- Yield: 8 servings 1x
- Category: Dessert
- Method: Stovetop
- Cuisine: American
Description
A warm and cozy combination of traditional French Silk Pie with a topping of Irish Cream Silk.
Ingredients
1 Pie Crust:
- 1 1/4 cup Flour
- 7 Tbsp Butter, cubed and frozen
- 1/4 tsp Salt
- 2 Tbsp Ice Water
For Pie Filling:
- 1 cup Heavy Cream
- 3 Eggs
- 3/4 cup Sugar
- 2 Tbsp Water
- 4 ounces Semi Sweet Chocolate Chips, melted
- 2 tsp Vanilla Extract, divided
- 1/2 cup Butter, cubed and softened
- 2 Tbsp Irish Cream liquor
Instructions
- In food processor, combine flour and salt. Pulse to combine. Add in cubed butter and pulse until flour forms into pea sized crumbs.
- Turn food processor on and add in ice water. Keep running until dough starts to form and creates a ball.
- Remove from food processor, shape into disk and wrap in plastic wrap. Place disk in fridge for 20 minutes.
- Preheat oven to 375 degrees. Roll out dough disk to fit a 9 inch pie pan – approximately 14″ in diameter. Place in pie plate and crimp edges. Using fork poke several holes into the crust.
- Place pie plate with dough back into fridge or freezer for 15 more minutes. Remove and line with aluminum foil. Fill with pie weights or pie chain.
- Bake for 25 minutes, removing the foil and pie weights and bake for another 10 or until golden brown. Remove from oven and allow to cool on wire rack.
- In a stand mixer, whip cream until stiff peaks form. Transfer to bowl and refrigerate.
- In a medium heat proof bowl, whisk together sugar, eggs and water. Place bowl over a saucepan that has been filled with 1 cup of water.
- Turn heat to medium and create a mock-double boiler. Using a hand held mixer set on medium-low, beat the sugar/egg mixture until it reaches approximately 160 degrees – about 10 minutes.
- Remove from bowl from the double boiler and continue to beat with hand mixer until the egg mixture has returned to near room temperature. Egg mixture should be fluffy and glossy.
- Divide the egg mixture into two separate bowls. In one bowl with ½ of the egg/sugar mixture, add the melted chocolate and ¼ cup of the cubed and softened butter and 1 teaspoon of vanilla. Beat with cleaned hand mixer until the butter has incorporated. Set aside.
- Clean hand mixer beaters before beginning next bowl. In second bowl with other ½ of the egg/sugar mixture, add in Irish Cream, ¼ cup cubed and softened butter and remaining 1 teaspoon of vanilla. Beat until butter has been incorporated.
- Lastly, using a rubber spatula, divide the chilled whipped cream into the chocolate bowl and the Irish Cream bowl. Gently fold the divided whipped cream into each bowl until no white streaks of cream are visible.
- Pour the folded chocolate mixture into the bottom of the cool pie pan and spread evenly. Repeat the same process, topping the chocolate mixture with the Irish Cream Mixture. Smooth out.
- Place in fridge for at least 3 hours to set, or overnight. Slice, serve and devour.
Notes
Pie crust marginally adapted from Kirsten Kubert of Comfortably Domestic’s Perfect Pie Crust, Irish Cream and Chocolate Silk pie inspired by Cook’s Country French Silk Chocolate Pie.

Do you know what’s totally bizarre – I have the same kitchen counters as you, the same silpat and the same marble rolling pin. In the picture of the rolled out pie crust on the silpat, I could have sworn I was looking at my own kitchen and was totally confused. I presume you didn’t sneak over while I was sleeping and make a pie in my flat…
Also, I’m getting a food processor next week and this pie may well be the very first thing I use it for!
I heart silpats. For the baking challenged like myself, they are a God send!
This looks just divine, Megan! Hope you will have a fabulous first T-giving as Mrs. Keno! Hugs!
Gorgeous!! I need a new silpat…. I sliced mine being stupid a while back. They make pie crust transferring SO much easier!
There’s something about the name ‘chocolate silk’ that just sounds completely incredible. This pie looks sooo good…definitely pinned to make soon!
a) Yay for Silpats. b) I saw these photos on Instagram last night and this recipe totally did not disappoint. Wanna come make me pie for Thanksgiving? 😉
Make the pie, Tara – Make it!! hahah It totally doesn’t disappoint. Ben flipped for it.
Who cares about the crust when the filling looks like that! I’ve been using that silpat trick for ages. I love it.
The sil pat trick works everytime, love it!! And seriously, I want to just eat the filling, screw the crust part of it haha Give me a spoon 🙂
oh my..I have literally been thinking about and wanting this pie since you posted it on instagram! hah Im so happy you didnt wait long to share!
Make. The. PIE!! Or better yet, forego the crust part of it and just make the filling. Eat it with a spoon, don’t be a hero 🙂
Mmmmm… pie. Love the crust tips – I’ve only ever made pie crust once, and it actually turned out, but it isn’t second nature just yet!
I was so thrilled everyone came together to hand out some pie tips to me so I could pass them on just in time for hte holidays. I used all the tips this time around and I have a pie in the oven as I type – the tips and tricks all worked GREAT!
Know what I wish? That we were neighbors. Because I would sneak over to your house while you were at work and devour this pie. I mean…ask for a small petite slice. 🙂 Awesome and the crust looks beautiful!
We can totally be neighbors and get really really ridiculously fat together. This would either be a BRILLIANT idea or a terrible one for that sole reason. Or we will be going to the gym together EVERYDAY, which is probably the way it should be – my jeans hate me right now. haha
Pie crust definitely can be tricky and it looks like you’ve cracked the pie crust code! I’ve never seen the pie beads before and this makes me want to ramp up my pie crust quality – I usually just role, poke and stuff and definitely could use these tricks for improvement! Irish cream silk pie sounds daaaaaaaaaaaaaaaangerous! You’re a brave soul – I’d eat get out of control with that thing!
Thanks for the pie tips Julia!I have another pie in the oven as I type and I think this one is a hit! Woot!
HOLY yum!!!
I know – it totally is – I could totally get rid of the crust part and just eat the filling! haha
holy crap – now why couldn’t we have made this as well while i was there?! just kidding. this looks so silky and light and fluffy. something i want at my thanksgiving table year after year!!
I will so make this if we have time when I’m out in a couple week – or better yet – i’ll just make the filling, who cares about the crust haha.
What a beautiful concoction this is…wow, I love, I love!!
Thank you Cathy!! It’s totally a hit with the husband – so anytime that happens its a win in my book!
OH MY GAHHHHHHHHHHDDDDD.
I know, I’m such a bad bad food blogger – mixing Baileys and Chocolate in pie crust haha
such an amazing sweet sin!!
I seriously scream when I read this post. You sure know how to throw a party! This looks amazing!! Please, let me be your neighbor. 🙂
Pingback: Thanksgiving Pie Round Up « Comfortably Domestic
Pingback: Country Cleaver » Cranberry Dutch Apple Pie
Apparently I need a silpat. For some reason I always want to call it a spillat. Like the sound you hear a cartoon character make when they hit the ground. I have no idea why my brain goes there.
Love this pie. Need this pie. Must bury my face in this pie.
Can’t wait to meet you next week.
I could eat 50 pounds of this pie!!! No joke.
Pingback: Country Cleaver » {5th Day of Christmas} – 13 Cup KitchenAid Food Processor
Pingback: The ULTIMATE Christmas Treats Roundup! | The Domestic Rebel
Hi! We had to wait 2 days to eat this pie and it was worth it! I do have one question. The baileys mixture didn’t set like the chocolate one. It was a bit runny and had a pale yellow color. Why do you think that happened? Not quite like your photo but it was still absolutely delicious.
Hi Marissa,
Bailey’s will give off a slightly yellow tint, so don’t worry about that. The cream or the egg whites might have needed to be whipped longer to help them get enough air in them to set completely. I would just beat it all longer and that should fix it. But I’m glad it was a hit all the same!! 🙂 Megan
Pingback: All Day I Dream About Pie: Pie Gazing for Pi Day | Comfortably Domestic
Pingback: Country Cleaver 15 Favorite Irish Cream Recipes » Country Cleaver
I normally always go for store bought *gasp* it’s awful, I really need to start making my own! Love the tips!