How to Segment an Orange
Freshly segmented oranges can really showcase a fine salad or dish! Learn the tricks to perfectly segmented citrus for this holiday season without leaving a lot of fruit behind!
Dish Count :: 1 Paring knife, 1 Cutting Board

Why didn’t 30 come with a warning that one glass of wine meant that I was going to wake up with a raging migraine the next day? Also that my big left toe was going to mysteriously develop a soreness it in the very next day? Welcome to 3-0? What the fresh hell is this? I’m going on 30, not 87. I mean, don’t get me wrong, Cream of Wheat makes my world go ’round, but I’m not ancient and crotchety just yet!
The simple things still bring me joy – like puppies, small children (I don’t have a yard yet to yell at them to get off of), and fresh oranges for that perfect salad.
Dear Martha, you made segmented oranges so elegant, but truth be told, half the time I spent doing them, I wasted half of the orange!! No more! Here are a couple of keys to keeping that glorious fresh fruit intact, and getting the most out of the seasons citrus season.
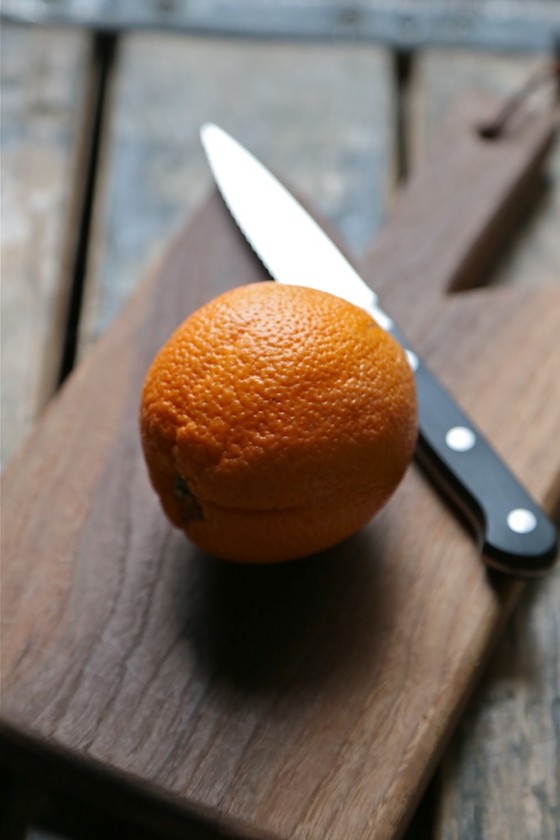
The best knife for segmenting an orange is a paring knife – they are easy to handle and maneuver compared to a larger chef’s knife. Mine is serrated, and it makes for very clean cuts in the citrus as well. Non-serrated is just fine, too. Whatever you have, smaller is better.
Turn your orange on the side, and slice off the two ends of the orange.

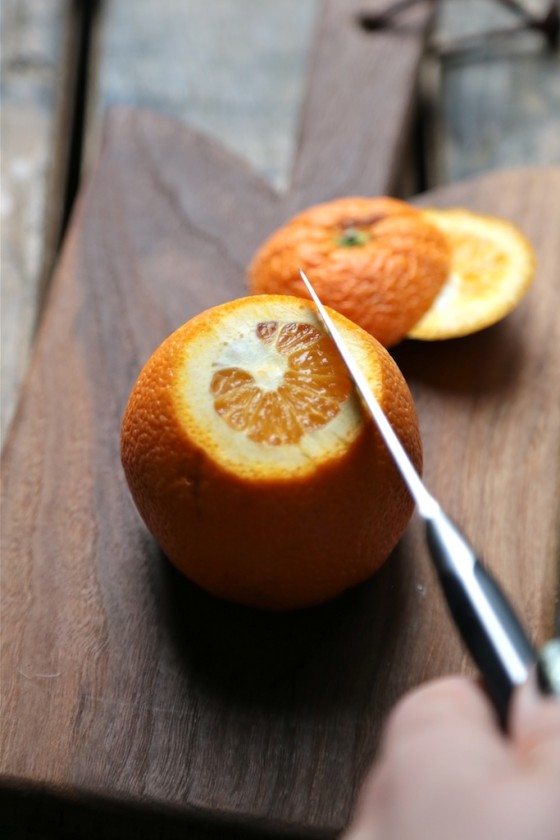
Now, line up your paring knife between the flesh of the orange and the white pith of the orange to make your first slice. Slice down, and follow the curve of the orange until you reach the cutting board.
Viola!

Next, line up your knife again, at the edge of the pith again, and repeat. Use the edge of the pith as your guide to cut around the orange. Lather, rinse, repeat around the whole orange.

Once the whole orange is devoid of it’s skin, now it’s time to segment. With the orange on it’s side, line up your paring knife with the white lines on the orange and cut down to the center of the orange. Start with one line, and then rotate the orange slightly to cut out the next adjacent line – cutting out one segment of the orange!

Repeat this again all the way around the orange! Bingo, bango you’re done! Toss these beautiful segmented oranges onto a winter salad, or fruit plate for your winter entertaining! It’s such a simple trick, but oh so elegant.

Need more holiday how-to’s? Click on these easy tricks to make you the hostess with the mostest!
How to Make Compound Butter + 10 More butters to try!!

How to make Perfect Whipped Cream

How to make the Perfect Salted Caramel Sauce


Another great how-to! I bet this would work great with grapefruits as well 🙂 If I’m feeling the way you feel at 27, then I’m terrified for when I hit the big 3-0! Hope you had a great birthday!
You are so smart! Love your how-to’s!
I’m really looking forward to citrus season! Thanks for the great tips!
Perfect! I have never segmented an orange before but you better bet I’m going to now! Thanks for the step by step!
OMG – you would think as a food blogger I could segment an orange in my sleep but the other day I asked my husband if he would because I was drawing a blank! lol
This is a great tutorial! I am not sure I would of know how to do it properly without this!
You always have the best tutorials! I love segmented citrus in salads, the best!
Thanks so much Aggie!! The how-to posts are my favorite ones to write 🙂
What a great tip! Thanks for sharing!
I love orange, but I am often lazy to segment them. This is a good way. Thank you, Megan!
Great tip for citrus season!!!
Beautiful!
I was just segmenting grapefruits the other day, using this exact method. I wish I had known how to do this years ago when I first starting cooking!
This is a great tutorial! I love segmented oranges, I hate the pith and want every bit gone 🙂
Great pictures for a how to!
Awesome how-to’s
I really do enjoy your how-to posts and this is such a great tutorial!