How To Make Pie Crust
This post may contain affiliate links, that if you make purchases through, I will earn a small commission.
Put away your battle gear, wipe the war paint off of your gorgeous faces, put down the booze – because you won’t need any of it any more when you head into the kitchen for your next pie-venture. I’ve failed at so many, its embarassing. I used to resort to the store bought crusts under the veil of convenience, but I knew I was buying them only because I was an absolute horror at making them myself. Compliments would roll in about how fantastic the crusts were, “just like mom used to make”, “mmm, so flaky”, “Oh yeah Mmm, can I have this recipe? My wife needs to learn this one.” and I would conveniently forget it every time they asked… Yup, I’m a full on FRAUD. Or was. But making a pie crust was stressful, inevitably ending up with me just throwing my hands up in the air, falling down on the ground with the most exasperating of sighs and throw a full on adult tantrum. Huck would get concerned and grow an extra wrinkle on his forehead, Ben would shake his head and walk away never to be seen again. It was ugly. But no more. And learning how to make pie crust was made easy in one simple step – USE A FOOD PROCESSOR.
Did a light bulb just got off for your, too? Oh good. My dear friend Kirsten introduced me to her recipe for her No Excuses Pie crust almost three years ago and it has been my pillar for all other pie crusts after it.
One thing I learned along the way, was to substitute a little vegetable shortening, like Crisco, for some of the butter in the crust. Crisco has a higher melting point than butter, and for me, it seems to help minimize the shrinking and drooping of the pie crust along the edges of the pan.
The other key to your fats is to chill them. And not just chill – but freeze them. Cut your butters and shortening into small chunks before hand, place them in a small dish and stick them in the freezer until you’re ready to use them. I like keeping a few pieces tucked away in the freezer so I can just pluck them out when necessary.

In your food processor, pulse together your flour, sugar and salt until light and fluffy.
Add in your shortening. Pulse until it starts to resemble course meal.
Add in your butter and pulse in to combinem until it looks like course meal again.
For the water – just like the butter – make sure it is ice cold.
Turn on your food processor and pour in your water in a steady stream. The dough will start to form and right as it starts to gather and almost form a ball you’re done!

Remove it from the bowl, press it together into a tight ball. If you’re making a double batch, separate your dough into two even balls. Wrap your dough into plastic wrap and press down on the ball to form a large dish. I like to flatten mine as much as possible by hand – usually a 6 inch round disk, to minimize the amount of rolling I have to do later.
Place the disks into the fridge for at least one hour before rolling out.

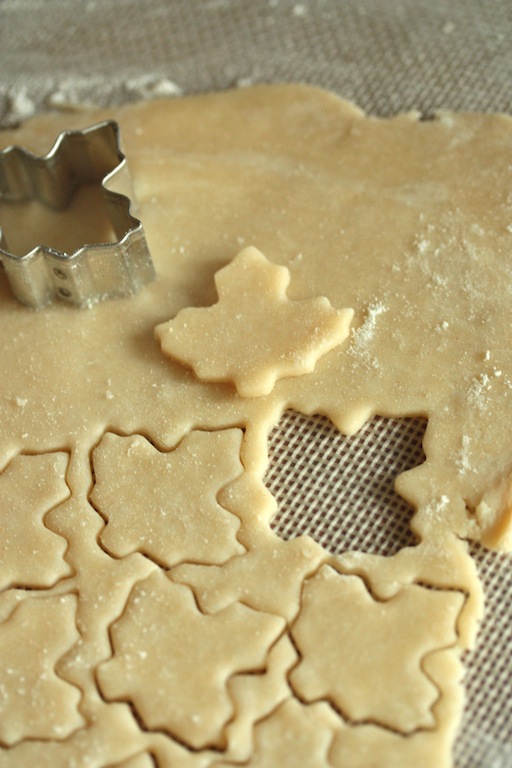
Roll out your dough to a 12″ circle, based on a 9″ pie pan. Cut off any access crust and gently fold the edges under for a clean edge. For decoration, use mini cookie cutters to cut out seasonal shapes for the edges. For fall, mini leaves look festive. When the edges have been prepared and crimped, place the crust back into the fridge to chill again for at least 30 minutes.
Ingredients for How To Make Pie Crust
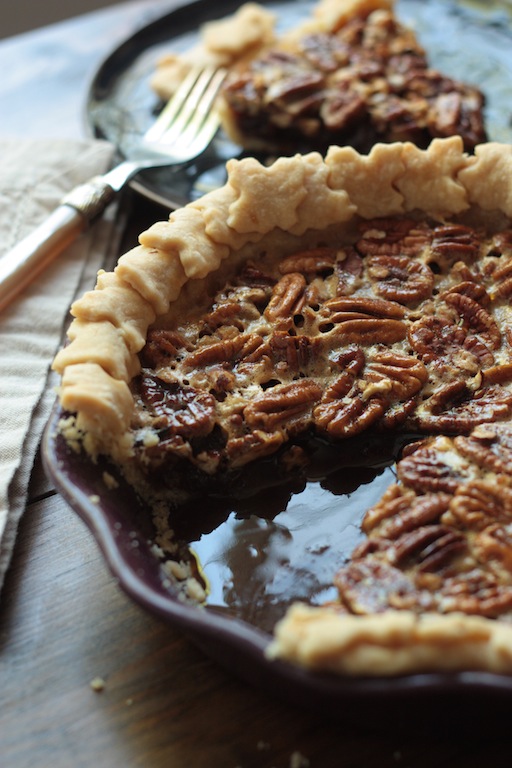
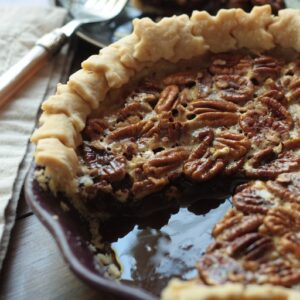
If you’re making a crust that must be partially baked ahead of time – like with this Nutella Pecan Pie, preheat your oven to 350 degrees. Gently line the crust with aluminum foil and pie weights. If you don’t have any, dried beans work speldidly and are budget friendly. Bake for 15-25 minutes (depending on the pie). Remove from oven, remove weights and foil then fill and bake again!
It really is so easy. No tantrums, fits, booze or war paint required. Ya hear? Now, I’m craving pie. Who’s gonna bake me one?
Inspired Homemade Recipes To Try

How To Make Pie Crust
- Prep Time: 30 minutes
- Cook Time: 25 minutes
- Total Time: 55 minutes
- Yield: 1 9-inch pie crust 1x
- Category: Dessert
- Method: Baked
- Cuisine: American
Description
A simple, flaky pie crust made in a food processor! This easy technique will give you a perfect crust every time.
Ingredients
- 1 1/4 cup Flour
- 1/2 tsp Salt
- 1 Tbsp Sugar
- 3 Tbsp Vegetable Shortening, cubed and chilled
- 5 Tbsp Butter, cubed and chilled
- 4–6 Tbsp Ice Cold Water
Instructions
- In food processor outfitted with blade attachment, pulse combine flour, sugar and salt. About 10 pulses.
- Add in vegetable shortening, and pulse to combine until the mixture resembles course meal. About 10 pulses.
- Add in chilled butter, and pulse to combine until the mixture resembles course meal. About 10 pulses.
- Turn on food processor and with a steady stream add in four tablespoons of ice cold water. Allow to mix until the dough has formed almost a total ball. If some extraneous crumbs remain, pat them into the ball.
- Flatten the dough ball into a 4-6inch disk, wrap in plastic wrap and place in fridge to chill for at least 30 minutes before rolling and baking.
- If partially baking the crust before filling, preheat oven to 350. Roll out dough on a floured surface, and place in pie pan. Lightly line with aluminum foil and line with pie weights.
- Bake for 25 minutes. Remove from oven and fill with filling. Bake according to chosen pie recipe.
Notes
Adapted from America’s Test Kitchen Basic Single Pie Crust

It’s good to hear that someone else has battled with pie crust, but then come out victorious in the end. I HAVE to try this method…particularly for the sake of my pie-loving husband.
Thanks Dara! I hope you do try it! I wish I would have known about this method sooner, it would have saved me many a-tantrums. And it would have saved my poor husband’s sanity. He doens’t have to witness my pie-induced meltdowns anymore hahah
I’ve been rollin’ pie crust since I could look over the counter, we are a pie family! Yours looks amazing. Good Job my friend ; )
A family that eats pies together stays together! That’s the best kinda family to be. 🙂
I have to try this method. Me and pie crust and no usually friends. Pretty darn excited about this!
I know, me too Tieghan. I would throw the worst adult tantrums ever. Thankfully I don’t have to anymore and my husband doesn’t roll his eyes at me nearly as much hhaha Food processor Pie Crusts FOREVER!
But, I’m still allowed to drink bourbon for fun while I bake, right? Right?! 😉
There is always room for bourbon in baking!! Now you can drink in pie crusted celebration instead of to drown pie crust sorrows haha
Your pie crust looks so flakey and perfect, I might not even need a filling for it! Just double crust and ice cream please.
The last few times I’ve made a pie crust it’s been a total bomb, definitely going to try it again with your directions!
I hope you try it Kathryn. I can’t believe it took me that long to try it with a food processor. It’s a dream machine with pastry crusts. I’m a true believer. 🙂
You make it look so easy! You may have just convinced me to stop buying already made crust. Or at the least you’ve convinced me I need to make a pie!
Leah you can totally make your own pie crust. Trust me on this one, after so many fails I finally got it right. You can, too!
That’s one gorgeous looking pie!!! I use cold shortening in my pie crusts, too!
Never fear the shortening! I love the split of butter and shortening. I feel like Rocky dancing at the top of the Philly stairs when my pies turn out!
Fabulous how-to! And that pie looks absolutely incredible!!
Thanks Marie, it’s a staple in our house during the holidays. I was so glad I could use it again other than at Thanksgiving 🙂
Some of my best pie crusts had both butter and shortening, and I love that yours does, too! It looks perfect, Megan!
Thanks Georgia! I used to use just butter, but they turn out just as great – or better with a little shortening. No shrinking, wilting or anything. It’s great.
Love this how to! Everyone needs to know how to make a pie crust.
I totally agree. No more pre made crusts for me!
Love this tutorial, Megan! I make my pie dough in the food processor, too, but use a different recipe. The processor is so perfect for pastry dough! 🙂
I never would have believed it was possible to do it in a food processor – but now its the only way I do it!
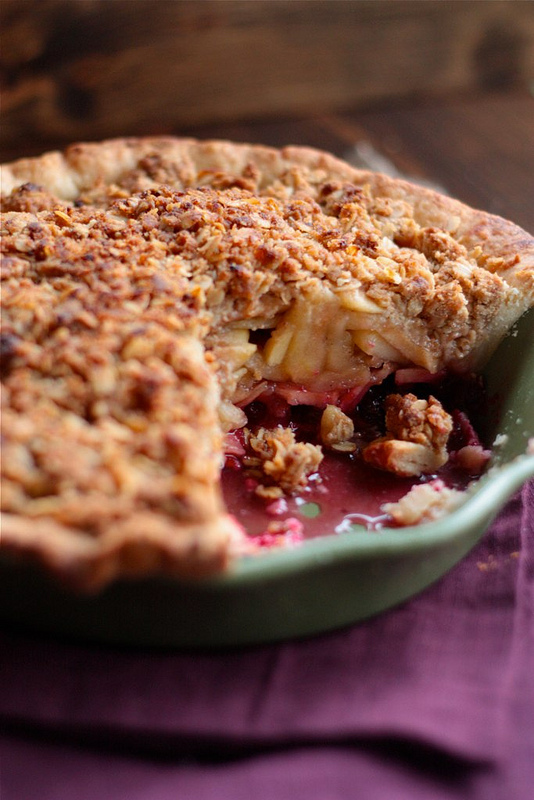
Kirsten’s No Excuses Pie Dough is my go-to recipe, as well. It’s fail-proof and perfect every time. I love your tutorial, Megan! I also love that snap of the Dutch Apple Cranberry Pie. I want one.
Thanks Jeanne! Kristens’ recipe was the best one for me to learn on. It is a my pie crust rock.
No booze…what? I love your tutorial since I will pie-ing soon! Thx Megan!!
Oh there is always room for booze. In this case it will be celebratory booze when you have your victory pie!
Gotta try making pie crust in the food processor next time! I consider myself a pseudo pie pro and I still struggle from time to time. Pies are just like that. Loving the look of this pecan pie!
I’m not much of a pie person but I’m totally craving an entire pie now! And this tutorial is awesome. I’ve always used the store-bought pie crust from TJ’s but that’s about to change very soon!
I’ve had so many pie crust flops that I’ve given up completely. I’d never thought of the food processor but it totally makes since. I’m giving this recipe a try ASAP!
You got some skillz! I always have a hard time with crust!
Megan, your crust does look lovely…as do all those pies. Is it weird that I’m craving Nutella Pecan Pie in 90 something degree weather?
Perfection! I love nothing more than homemade pie crust…totally worth the effort!
That looks like some seriously perfect dough!
This is exactly how I make my pie crusts, and it comes out fantastic every time! It’s also very forgiving if it tears.
This is a great how-to, it looks flawless 🙂
Pingback: The Ultimate Homemade Pie Crust: Three Recipes + Tips | Neighborfood